
How I Set Up My Stream Deck
The Elgato Stream Deck has becoming an invaluable piece of tech for me. It’s a streamlined way for me to manage live streams, devices, and automation. I absolutely love it. In-fact, since getting my first 15-Key Stream Deck, I’ve expanded to a 32-Key…and bought two more.
Here’s how I’ve configured all of my Stream Decks.
Last updated April 16, 2025.
What is a Stream Deck?
First up, what is a Stream Deck? It’s a hardware device with programmable buttons that you connect to your computer. It connects to services like OBS, Ecamm Live, YouTube, Twitch, Phillips Hue, Apple Shortcuts, and much more!
A lot of streamers and podcasters (myself included) use it to manage live recordings and their environments during a live stream – it’s like a mini control room that only needs one person to manage!
It also makes editing YouTube videos a lot easier. Adding lower thirds, URLs, and transitions with the push of a button sure beats doing it in post-production.
Why Not Just Use Keyboard Shortcuts?
A common question I get is, “Why can’t you just use keyboard shortcuts?” I do. I love keyboard shortcuts. I even have Raycast modify my Caps Lock key to make it a Hyper Key, for even more keyboard shortcuts.
But you can’t put custom graphics on keyboard shortcuts, and the truth is that the Stream Deck makes it way easier to remember certain actions. Plus, Stream Deck makes certain integrations, like with Phillips Hue, easier. The same thing goes with Ecamm Live.
How I’m Using the Stream Deck XL

I originally got the 15-key Stream Deck to switch between OBS scenes for my online courses. I wanted to easily move between talking head shots and slides without a ton of editing.
But I quickly discovered how powerful it can be, especially since it supports Keyboard Maestro, a Mac app for you to create your own advanced keyboard shortcuts and automated actions.
Today I have both a Stream Deck XL, Stream Deck +, and Stream Deck Neo, all with multiple pages. Let’s dive into the XL first!
Page 1 Configuration
Here’s what page 1 of my Stream Deck looks like:

Since the Stream Deck is for more than just streaming, I’ve set up page one mostly to run automations, time tracking, and lighting in my office. Here are a bunch of common tasks, mostly driven by the Shortcuts I’ve turned into “Apps.” Here’s the breakdown by Row and Column (marked R# for Row number, and C# for Column number).
Row 1:
The Stream Deck has been a game changer for me with time tracking. That what this row is mostly about.
R1C1: Turn on the Focus app. This will block distracting websites and apps, as well as start a Timery timer, and sets my devices’ focus modes to “Green Zone,” which kills all notifications except texts and calls from my wife, my mom, and my kids’ schools.
R1C2: Launches the “Start Timery” shortcut, which prompts me for which saved timer I want to start.
R1C3: Launches the “Stop Timery” shortcut, which stops the current timer.
R1C4: Launch the “Add Time” shortcut. If I forget to track time, this shortcut is perfect. It will prompt me for Project, Description, tags, start time, and an optional end time.
R1C5-C8: Various Timers in Timery: Writing, Management, Networking, Talk Prep
Row 2:
R2C1: Launch Casabona.org admin
R2C2: Launch Streamlined Podcaster admin
R2C3: Launch Streamlined Solopreneur admin
R2C4: Launch Apple Music
R2C5-C8: More Timery Timers: RSS.com work, Wizard’s Guild Work, Coaching, Personal Tasks and Meetings
Row 3:
R3C1: Previous Track in Apple Music
R3C2: Start/Pause Music in Apple Music
R3C3: Next Track in Apple Music
R3C4: Toggle Shuffle in Apple Music
R3C5-C8: Even MORE Timery Timers: CRM/Outreach, Podcast Production, Product Development, Website/Misc Client Work
Row 4:
R4C1: Turn Markdown Links into YouTube Friend Links (Shortcut)
R4C2: Toggle my Key Lights
R4C3: Turn on the Office
R4C4: Set my office lights red
R4C5: Set my office lights bright/white
R4C6: Set my office lights yellow
R4C7: Convert my custom Tella domain to the default Tella domain (Shortcut)
R4C8: Go to Page 2.
Page 2 Configuration
And here’s page two:

This page is for eCamm Live almost exclusively, and it changes a lot more, depending on what I’m recording and what scenes I want accessible, so I’m not going to take this one row-by-row. Here are some general descriptions though.
Whenever you see a Letter, that’s mapped to some camera view in Ecamm Live. I have the OBSBOT Tail 2, which allows me to create presets of various pans, tilts, and zooms, so I have a few sets and views based on if I’m sitting or standing. D and E are not used as often as the ones you’ll see later.
I also have buttons for Ecamm Live controls: show and hide comments during live streams, see the number of live stream viewers, add chapter markers, and show Ecamm Live in case I want to ddemo that.
The rest of what you see are scenes and overlays inside Ecamm Live.
How I’m Using the Stream Deck +

Since rearranging my office and desk, the Stream Deck+ sits closes to me, so I’ve turned that into my primary camera and live stream controls.
The dials are great for adjusting lighting and the OBSBOT camera.
Page 1: Camera Control and Adjustments

R1C1: Set Scene to Camera-only View
R1C2: Switch to Camera A (My Sony a6400)
R1C3: Set Scene to Screen Sharing
R1C4: Go Live/Record
R2C1: Switch to Camera B (Tail 2 Top-down view)
R2C2: Switch to Camera C (Tail 2 Whiteboard view)
R2C3: Add Camera A overlay to current scene
R2C4: Go to next page
Dial 1: Change Keylight Color Temperature. Pressing the dial will cycle through my 3 Keylights. Tapping the screen panel will turn the Keylight on or off.
Dial 2: Change Keylight Brightness. Pressing the dial will cycle through my 3 Keylights. Tapping the screen panel will turn the Keylight on or off.
Dial 3: Control Tail 2. Pressing the dial will cycle through Zoom, Color Temperature, and Saturation
Dial 4: Adjust input level on main mic
Page 2: RSS.com / Elgato Prompter
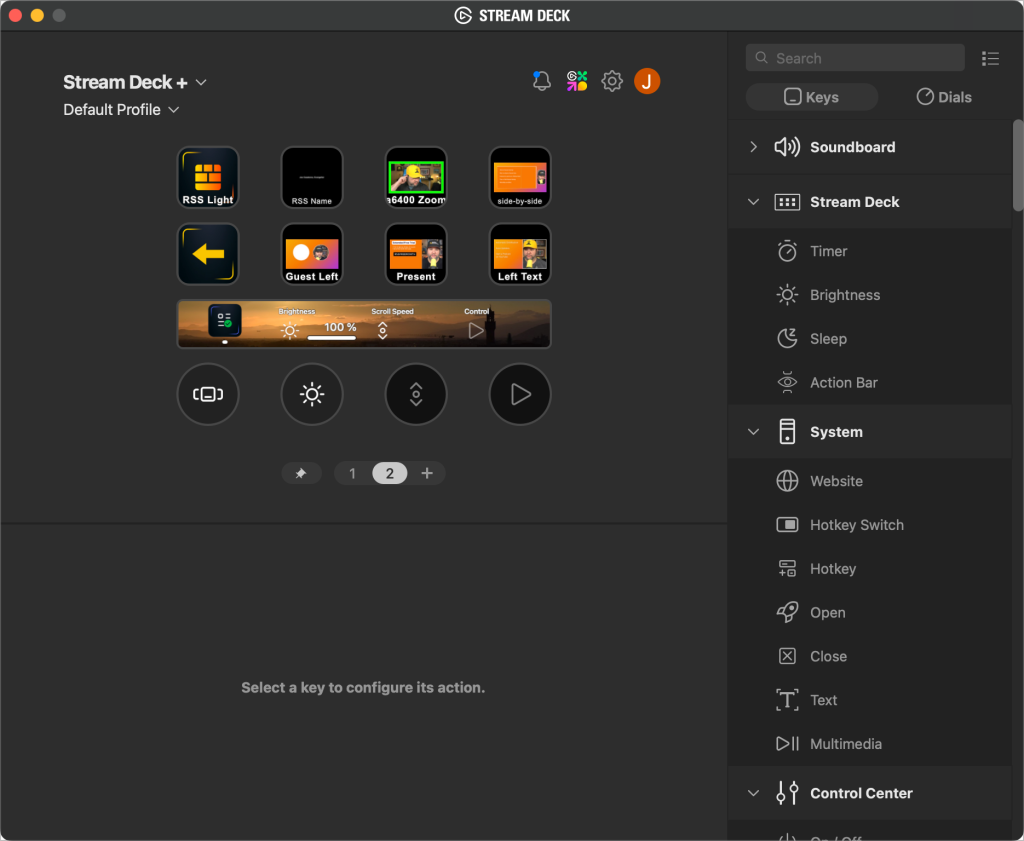
All of the buttons on Page 2 control scenes designed specifically for my RSS.com videos, including:
- Setting my lights to orange
- Adding my title as a lower third
- Screen sharing with an RSS.com branded background
- Scenes for when we have guests
- Scenes with presentation text and graphics.
The dials are dedicated to the Elgato Prompter.
I love the Elgato Prompter — it’s the first teleprompter that’s actually worked for me. So I decided to set up all of the actions I can on a page in the Stream Deck +. Functions include:
- Switch between scrollable text and a second monitor for the computer
- Control the brightness of the Prompter screen
- Adjust the scroll speed of text
- Start/Stop the scroll + scroll up or down manually
Stream Deck Neo

My friend Cat told me about this on an episode of Streamlined Solopreneur, and I couldn’t resist. I’m using it for some simple core functions and it’s always in reach right above my keyboard.
The bottom is set: it shows the date and time, and the two buttons on either end are built-in page turners.
Page 1
This page is a hodgepodge of common functions I’m looking for:
R1C1, R1C2, R2C1, and R2C2 all control Tella.tv:
- Start/Stop Recording
- Restart Recording
- Preview / go to Edit Screen
- Delete Recording
R1C3 sets my Do Not Disturb Focus Mode
R1C4 Starts a screen-only recording in CleanShot. I like this because it’s usually no audio, and automatically uploaded with a share link. I’m usually sending these to support folks.
R2C3 is my recording light status. Red when I’m recording. White when I’m not, so my family knows.
R2C4 opens up the Stream Deck app, which frustratingly does not stay in the dock, and disappears as soon as you click out of it.
Page 2: Zoom Controls
Now, the native Stream Deck Zoom plugin (unofficial) went mostly paywalled, and Zoom doesn’t allow system-wide keyboard shortcuts. So these are actual mostly driven through Raycast:
R1C1: A Keyboard Maestro script to move the active window to the other display. Super helpful for when someone shares their screen, as Zoom is usually on my Elgato Prompter.
R1C2: Toggle Video
R1C3: Share my screen
R1C4: Record the call
R2C1: Toggle Chat window
R2C2: Toggle Mic Mute
R2C3: Leave Call
R2C4: End Zoom for everyone*
*This doesn’t actually work reliably.
Additional Apps and Tools
Aside from the Stream Deck and accompanying software (which supports a lot of stuff out of the box), there are a few plugins and graphics I’m using.
Additional Plugins
I’m using a few plugins to help me automate. All of them can be found in the Stream Deck Shop plugins area:
- Keyboard Maestro: The companion plugin to the App, this allows you to map macros directly to Stream Deck buttons.
- Ecamm Live: This one gets installed when you install Ecamm Live. It even comes with its own pre-configured profile.
- OBSBOT Webcam to control my Tail 2
Icon Set: MacStories Pixel Shortcuts Icons
For many of the icons, I’m using the Shortcuts Icons set by MacStories Pixel. These are designed really well, there are a ton, and it gives the Stream Deck a consistent look across each button.
They were originally designed for use with iOS Shortcuts, which I also use them for. But since they are standard images I can use them for the Stream Deck as well.
Outside of that, I’m using some icon sets from the marketplace:
Want to see me go full redesign mode on this? Check out this live stream:
Have Questions about the Stream Deck?
Do you have a Stream Deck? Want to see what’s possible? Let me know in the comments!
Hi Joe,
Thanks for this article – it’s great to see how others are using Stream Decks too!
Just a quick question, where you say;
“It also brings Zoom up to the active window in-case I’m somewhere else.”
How did you achieve this?
Thanks!
Tim
Hi,
thanks for that great article. Is there a chance/way you can share the used macros? I’m new to KM and that OBS/Stream Deck stuff 🙂
Amazing article! I’m just starting to configure my deck and this gave me a ton of ideas.
Great article. I’m not a streamer but this gave me great ideas to try.
Great post, Joe! I love how you’ve personalized your Stream Deck configurations. The tips on organizing actions by categories are especially helpful. I’m inspired to try out some of your suggestions to streamline my own workflow!
Great post, Joe! I loved how you detailed the different setups for your Stream Deck. It really inspired me to explore more custom actions for my own setup. Do you have any tips for optimizing workflows for specific applications? Thanks!
Thank you for sharing your Stream Deck setup, Joe! I loved the section on macros; it opened my eyes to new possibilities for enhancing my workflow. I’ve been thinking about adding a few custom buttons, and your tips were super helpful. Can’t wait to try out your suggestions!
Great post, Joe! I love how you customized your Stream Deck for your workflow. The specific tools you highlighted really resonated with me, especially the way you set up your shortcuts for more efficiency. I’ll definitely be trying some of these configurations out! Thanks for sharing!
Great insights, Joe! I love how you customized your Stream Deck for maximum productivity. Your tips on integrating different apps are really helpful. Can’t wait to try some of these configurations myself!
Great post, Joe! I loved how you broke down your Stream Deck configuration. Your tips for customizing the keys with specific app shortcuts are super helpful. Can’t wait to implement some of your suggestions into my setup!
Great insights, Joe! I love how you customized your Stream Deck for productivity. Your tips on key mappings are super helpful—I can’t wait to try them out!
Great insights, Joe! I love how you customized your Stream Deck to enhance your workflow. I’m definitely going to try out some of your automation tips. Thanks for sharing!